Perth’s Ducted Reverse Cycle Air Conditioning: Step-by-Step with the Pros
Perth’s climate can swing from scorching 35°C summer afternoons to chilly winter mornings where you just want the room warmed to a comfortable 22°C. A ducted reverse cycle air conditioning system is designed to handle both extremes, providing reliable year-round comfort for your entire home.
But what actually goes on behind the scenes when Perth’s top installers set up one of these systems? In this guide, we’ll break down the step-by-step installation process – from the initial consultation and customised quote, through to the system design, installation, and final handover. Along the way, you’ll find practical tips, real-world insights, and even a comparison table to help you clearly understand why ducted reverse cycle air conditioning is such a popular choice in Perth. By the end, you’ll know exactly what to expect when working with a professional service.
Why Ducted Reverse Cycle AC Is Perfect for Perth’s Climate
Perth’s weather swings wildly: BOM climate data shows January highs average around 31.4°C, while July lows dip to about 8.1° C. That means you need a system that can both cool and heat efficiently. Ducted reverse cycle air conditioning is tailor-made for this. It uses a central unit that can reverse its refrigeration process, so in summer it extracts heat from indoors and ejects it outside, and in winter it flips around to pump outdoor heat back in. The result? One system, year-round comfort.
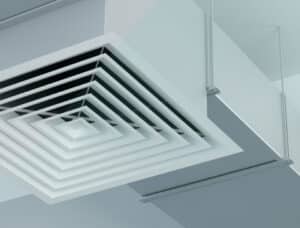
Leading Perth installers point out that ducted systems are “a game-changer” for our weather. As one expert notes, the “unique ability to heat and cool” makes them ideal for WA’s climate, offering reliable comfort in both scorching summers and chilly winters. In practice, this means your home can stay at just the right temperature all the time. Plus, ducted systems distribute conditioned air through hidden ceiling vents, giving whole-home zoning and a clean look. They even improve air quality with built-in filters.
Here’s a quick feature comparison to put things in perspective:
| Feature | Ducted Reverse Cycle AC | Split-System AC | Evaporative Cooler |
| Coverage | Whole-home via ceiling vents; zoning control | Single-room ; one unit per room | Whole-house but no zoning; air pulled from outside |
| Heating Capability | Yes – heats and cools with reverse cycle | Some models heat, but many are cooling-only | No |
| Humidity Handling | Excellent – works well even in humid Perth summers | Good – still effective in humidity | Limited – best in dry conditions; less effective in humidity |
| Installation Complexity | High | Moderate | Moderate |
| Upfront Cost | Higher – involves ducts and full system | Lower than ducted | Usually lowest initial cost |
| Aesthetics | Discreet vents in ceiling | Wall-mounted units visible in each room | Ceiling vents + large outdoor unit visible on roof |
Table: Comparing ducted reverse cycle air conditioning with other common systems.
As the table and experts highlight, ducted reverse cycle systems win on year-round climate control and aesthetics. You get whole-home comfort and zoning which can cut running costs. Perth specialists also note ducted units are built to last and handle our extreme weather; they are strong enough to handle Perth’s climate extremes, from searing heatwaves to cold snaps. In other words: your home’s internal climate can feel just right, no matter the season.
Step 1: Survey, Planning & Quoting
Before any tools or aircon bits arrive, a top-rated ducted AC service starts with a thorough site survey and design plan. This is where they literally walk around your home with you and figure out your needs. They’ll ask about how many people live there, which rooms matter most, and your budget. As part of this, they consider key factors like home size and insulation quality
You might get an eye-opening lesson in electrical stuff here. In Perth, installing a big AC system isn’t a DIY job; it requires certified pros. In fact, it’s illegal to install ducted AC without the right licenses. A licensed electrician/refrigeration technician must do the wiring and refrigerant handling. Good installers know this cold; they’ll handle permits or licenses for you.
By the end of step 1, you should have a quote in hand. Expect a price range start around $8,500 for a basic 3-4 bedroom home, rising with size and features. The quote usually comes with a zone plan or system design too. Top tips: Ask questions here! For example: “How many zones will we have?” or “What brand and energy rating does this unit have?” They should explain that higher-SEER units cost more upfront but save you on power bills later.
Once you green-light the quote, the installer and you schedule the work. According to Perth City Air, typical installation timeframes are about 6–8 hours for a ducted system once everything’s ready but often it’s split over 2 days, especially for larger homes
Step 2: Preparing the Home & Layout
On “D-day,” the techs arrive early. First, they protect your home: laying drop sheets, taping off walls, and maybe wearing boot covers. You’ll want clear access to your roof space any meter box or electrical room, and the areas where vents go in the ceilings.
Planning the Indoor Unit and Duct Routes
Next, the crew assesses the roof or ceiling cavity. This is a crucial moment: they’ll confirm the indoor fan coil unit’s placement and sketch the duct layout. You’ll literally see them marking lines on plans or the ceiling for each branch duct run. They’re making sure each zone can get proper airflow.
The installer is effectively creating a custom duct network, a hidden labyrinth of insulated ducts and vents to channel cool or warm air to every room. It’s almost like plumbing, but for air. The metal box of the indoor unit will connect to the outdoor condensing unit via refrigerant lines.
During this prep, they’ll also plan electrical work: running power lines, mounting circuit breakers or isolators for the units, and ensuring everything meets WA regs. In short, before any equipment goes up, the technicians have a clear step-by-step route in mind.
ducted reverse cycle air conditioning
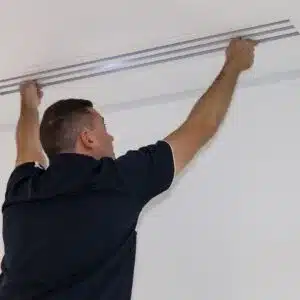
Step 3: Installing the Indoor Unit & Ductwork
Now comes the heavy lifting . According to Metropolitan Air Conditioning, installers first mount the indoor fan coil unit into the roof space. This is a critical placement: it needs to be accessible for future servicing but also well-positioned for balanced airflow. Then, flexible insulated ducts are clipped or screwed onto the unit’s outlets. Branch ducts snake out to ceiling vent locations in each room. Wall or ceiling vents are cut in, aligned with the planned layout.
During this process, screws are drilled through ceiling boards or floors to anchor the unit and ducts. Caulking or foam is added around openings to seal them. Quality installers ensure good insulation around ducts and neat stacking of ducts.
As one Perth service notes, size and placement are key factors: “the size of the home will determine the capacity needed,” and “consider the best location for units, taking into account accessibility, noise, and airflow”. They use those considerations now. If your home has multiple levels, they might even install two indoor units.
Throughout the indoor install, the crew also checks that every room’s duct and vent meet the plan. It’s smart to walk the zones with them: feel the vent placement, ask about final airflow. Some installers do a rough initial test airflow at this stage to ensure nothing is blocked before finishing.
Step 4: Installing the Outdoor Unit and Electrical Connections
While one team works inside, another may be on the ground or roof with the outdoor condenser unit. This is the big metal box with the fan . They mount it on a concrete pad or brackets on an exterior wall, ideally in a shaded, ventilated spot. Perth pros often choose a spot out of direct sun and away from neighbors’ bedrooms to minimize heat re-radiation and noise.
Once the outdoor unit is fixed, they connect copper refrigerant lines between it and the indoor unit. These lines carry the special refrigerant fluid that cools your air. Technicians must weld or flare the pipe ends and vacuum-test them for leaks; this is intricate work requiring certification.
Meanwhile, licensed electricians wire up the power. Upgrade your air conditioner | NSW Climate and Energy Action This includes running mains power to a dedicated breaker, installing a safety switch, and connecting it to the AC’s controls. As the Metro guide emphasizes, only pros should handle this: Australian law forbids unlicensed folks from wiring or charging refrigerants. The advantage of going with top services is they take care of all compliance: permits, electrical regulations, etc., so you don’t have to worry.
Finally, the team seals any exterior penetrations and tidies up the workspace.
Step 5: Testing, Balancing & User Training
With both indoor and outdoor units in place and wired, the installer is almost ready to celebrate. First, they test and commission the system. This means powering it up in cooling mode and heating mode, checking for refrigerant leaks, measuring airflow, and verifying each zone vents correctly. They’ll ensure the thermostat talk to the system and that the condensate drain is clear.
Often, they’ll balance the air: adjusting dampers in ducts to fine-tune how much air each vent gets. You might hear them holding a little balometer or just closing a damper flap until the living room feels right versus a bedroom. ducted reverse cycle air conditioning This careful balancing step makes sure no room is starved or drowned in conditioned air.
A hallmark of a professional service is handing over with clear instructions. The installer will walk you through how to use the smart zone panel or remote controls, and how to set up schedules if you have zoning. They’ll emphasize filter cleaning frequency and warranty details.
Perth City Air’s FAQ confirms the simple process: once the system runs correctly, “we run through the system operation to ensure it works then hand it over to the client with training on how to use it”. So yes you’ll get a mini tutorial on your new $10K machine. Don’t be shy about asking questions then! A good tech should happily show how to adjust zones or even demonstrate the night-time sleep mode.
After the Installation: Maintenance & Follow-Up
Your ducted reverse cycle air conditioning is now up and running. But top services don’t just vanish. They’ll schedule your first filter clean or service call Many will even send reminders: for example, Perth installers recommend service every 6–12 months depending on use. Regular maintenance keeps performance high and the air healthy.
Long-term, most of the system is hidden away but you’ll spot the vents on your ceiling and notice the outdoor box humming. Keep an eye on airflow or odd noises; if something seems off, call the installer sooner rather than later. It’s much better to fix a small leak or fan issue early than let efficiency drop by 20% from neglect!
Overall, the step-by-step investment in professional installation pays off. You end up with a well-integrated, energy-smart cooling/heating system that boosts comfort and even home value. As one industry guide notes, homes with ducted reverse cycle AC tend to be about 20% more energy-efficient than those without, saving you money on bills.
Conclusion
Installing a ducted reverse cycle air conditioning system in Perth is a major home upgrade – but with the right team, it’s surprisingly smooth. From that initial home survey and tailor-made design, through the precise installation of indoor/outdoor units and ductwork, to the final testing and your comfort demo – each step is well-defined and handled by the pros. By understanding this process, you’ll feel in control and confident that every dollar is well-spent.
Ready for year-round comfort? Contact a certified Perth installer and ask how they carry out each of these steps. With Perth’s blazing sun or winter chill, it pays to trust experienced hands. Enjoy your perfect indoor climate – the Perth way!
FAQs
-
How long does installing ducted reverse cycle AC take?
A typical install takes about 1–2 days. Once the unit size and duct plan are set, installers often complete a ducted system in 6–8 hours of actual work, spread over one or two days for clean-up. Larger homes or complex jobs can take longer.
-
Is professional installation mandatory, or can I DIY?
You must use professionals. By law, only certified technicians with electrical and refrigeration licences can install these systems. DIY or unlicensed work can be dangerous, inefficient, and will void warranties. Top Perth installers cover all legal and safety steps for you.
-
Can ducted AC be installed in any home?
Yes, ducted reverse cycle AC can fit most homes and buildings, including multi-storey houses and apartments . The installers will tailor the design to your layout. For small homes or single rooms, split-system units might be more cost-effective, but for medium to large homes, ducted is ideal.
-
How do I know I’m getting a trustworthy Perth service?
Look for companies with local licenses and good reviews. They should survey your site in person, give detailed quotes, and explain each step. References to official bodies help: for example, the Australian Refrigeration Council outlines required licences for technicians, and the Western Australian government specifies electrical license rules. Trusted installers will happily show their credentials and talk you through the process.
-
What’s the maintenance like?
Regular filter cleaning is essential – often every 3–6 months depending on use. Installers typically offer annual servicing to check refrigerant levels and clean coils. With proper care, a ducted system runs smoothly for 10–15 years or more.