
A professional aircon refers to an air conditioning system that is installed, maintained, and serviced by a licensed and experienced technician. Unlike DIY setups, a professionally installed aircon ensures correct sizing, proper placement, safe electrical connections, and efficient refrigerant handling.
This not only guarantees optimal cooling performance but also enhances energy efficiency, reduces running costs, and extends the system’s lifespan. In addition, professional installation helps maintain manufacturer warranties and complies with local Australian regulations, giving homeowners peace of mind and reliable indoor comfort throughout the year.
Why Professional Aircon Installation is Essential for Perth Homes
Perth’s summer temperatures can rise quickly, turning homes uncomfortably warm within minutes. Installing an air conditioning system professionally is essential for maintaining consistent indoor comfort and energy efficiency. A professional aircon installation ensures the system operates safely, performs effectively, and lasts longer. To help homeowners achieve optimal results, the following nine practical tips outline the key steps involved in selecting, installing, and maintaining an air conditioning unit from choosing the right model to completing final performance and safety checks.
1. Choose the Right Aircon System for Your Space
Before anything else, pick an air conditioner that fits your needs. Are you after a single-room split system, a portable unit, or a whole-house ducted setup? Think about the size of your home and rooms. A too-small unit will struggle to cool properly, while an oversized one will eat electricity and cycle on/off constantly. Pro installers always start by matching capacity to your home: they consider how many rooms you want to cool and their insulation.
For example, a small bedroom might only need a 2.5 kW split system, while a big open-plan living area could require a 6–7 kW model. Brands like Daikin and Mitsubishi are popular in Perth, but whatever you choose, make sure it’s the right size. Getting this right up front makes professional aircon installation much smoother.
2. Hire a Licensed Pro for the Site Survey
Never skip the site survey. A professional aircon installer in Perth will come to your home first to check everything. They’ll measure your house size, count rooms, and figure out the best spots for both indoor and outdoor units For instance, they’ll look at where walls or rafters can hold the unit’s weight, and whether vents or ducts can reach everywhere you need.
This step is crucial it’s the blueprint of your install. Importantly, Australian law requires a licensed installer for aircon work. Handling refrigerant and wiring without the right licences isn’t just risky, it’s illegal In Western Australia, any electrical work on an aircon must be done by someone with a refrigeration and air-conditioning restricted electrical licence so make sure you book a qualified technician. A good installer will explain the plan, answer questions, and sometimes use a checklist like:
- Home dimensions: Total area and ceiling height determine capacity.
- Room count and layout: Determines how many units or zones you need.
- Outdoor unit placement: They’ll scout for shade, airflow, and noise concerns.
Indoor unit location: High on a wall in an open area, away from heat sources.
This professional survey lays the groundwork for a flawless installation.
3. Plan Your Indoor & Outdoor Unit Locations
Where you put the aircon really matters. Outdoors, the condenser needs room to breathe. Don’t squeeze it in a cluttered courtyard or right under a big oak. Ideally, choose a shaded, well-ventilated area not baking in the sun. Technicians often pad-mount it or use wall brackets to keep it steady.
Indoors, the wall unit should be high up on a central wall for good airflow, not blocked by furniture or curtains. Avoid corners or behind doors. Also, keep at least 10–15 cm of clearance around units so installers can work and you can service them later.
Here in Perth, that might mean avoiding the north-facing wall if the afternoon sun is blazing. Sometimes multi-head splits or ducted vents give more flexibility, but even then, think airflow and access. Remember, these locations are usually final moving them later means extra cost. Planning before installation means better performance and fewer headaches.
4. Clear and Prepare the Installation Area
Before the big day, get your house in order. The installers will need space to move around inside and out. Trim any nearby shrubs, move patio furniture, toys or bikes away from the outdoor unit spot Inside, clear floor space under the wall you chose, and keep the path from door to work area free. Check windows if you have a window or wall unit – the screens must come off and the glass/frame be in good shape.
Even hanging a wooden picture frame crooked can mean the mount for the aircon will be off-kilter! Lastly, cover any fragile outlets or furniture with drop-sheets or plastic; drilling and dust are inevitable during install. If you have kids or pets, block them from the work zones. Prepared homes lead to faster installs and happier homeowners.
5. Check Your Power Supply and Wiring
An aircon needs its own electrical setup. A 2–3 kW split system will draw around 10–15 amps, so typically you’ll need a dedicated circuit and a matching breaker. Before installation, confirm with your electrician or the installer whether your switchboard can handle the extra load. In some cases, an upgrade or new wiring is needed, especially for big ducted systems. Always leave this to the pros: licensed electricians will connect your new aircon to the mains safely.
In WA, rules are strict about this – all electrical work on ACs must be done by a licensed REL holder. Don’t be tempted to DIY this part! A qualified installer will ensure the cable is the correct size, the circuit breaker is set up, and everything is earthed properly. This avoids blown fuses or worse down the line. One tip: if you’re replacing an old unit, ask the installer to check the existing wiring. Reusing an old hole or switch? Make sure it’s still up to code. In short, professional aircon installation always includes an electrical safety check; it’s as important as placing the units themselves.
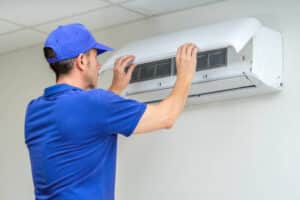
professional aircon installation
6. Follow the Installation Process Meticulously
This is where the magic happens. A professional installer will start by fixing mounting brackets or a base pad and a sturdy bracket on the wall indoors. Next, they’ll drill a small hole through the wall for the refrigerant lines, condensate drain, and cables to pass. Then comes the fun engineering: bending and running copper refrigerant lines, gas-testing and vacuuming to remove air, and securely connecting everything. It’s a bit like plumbing and welding rolled into one. Here’s a rough idea of the key steps:
- Mount equipment: Secure the indoor unit to its wall bracket and the outdoor unit to its pad/brackets.
- Run the pipes and cables: The installer threads refrigerant lines, a drain hose, and electrical wiring through the wall hole. They’ll carefully bend the lines for neatness and leak-free joints.
- Charge with refrigerant: After vacuuming out the air, they introduce refrigerant gas into the system. This step must be done by a licensed tech, using gauges and tools to get the right charge.
- Seal and tidy: All drilled holes get sealed to prevent air leaks, and any exposed pipes get covered with insulating sleeve to stop energy loss.
Throughout, the technician follows manufacturer specs and safety protocols. As Metro Air Conditioning notes, this “methodical execution” is critical for success. If all goes well, the indoor unit will sit flush, the outdoor unit solid, and the whole system will look professionally finished.
7. Test, Tune and Clean Up
The job isn’t over once the hardware is in place. A thorough system test is key. The installer will power up the aircon and run it through several modes – cooling, heating , and fan-only. They’ll check that cold air is indeed coming from the indoor unit, and that the outdoor unit is expelling hot air.
During testing, watch for issues: noises, leaks, or odd smells. The tech should inspect all connections one more time – tightening bolts, checking electrical terminals, and listening for hissing . Leaks or loose fittings can cause poor cooling or even damage. Once satisfied, they’ll vacate the workspace: sweeping up dust, removing protective sheets, and putting furniture back.
At handover, a good installer will walk you through using the remote control, explain the thermostat settings, and give quick maintenance tips. A final quality check might include ensuring the condensate drain is working, and that the outdoor unit’s fan clears its vibrations. Remember, a professional aircon installation always includes this final commissioning; it’s what turns a pile of hardware into a working, comfortable system.
8. Optimize Efficiency and Comfort
Your installer’s work isn’t just about slapping in a new AC; it’s about maximizing efficiency. After installing, there are a few tweaks that make your aircon work smarter:
- Insulate and seal: Check that the hole around the pipes is sealed, and that ducts are insulated. A well-sealed home means less load on your unit.
- Smart thermostat: Consider adding a smart or programmable thermostat. Smart thermostats can learn your schedule and adjust the AC automatically they can turn down cooling when you’re out and ramp it up before you return. This saves energy and money.
- Use energy ratings: If possible, pick a high-star rated unit . The extra upfront cost is often offset by lower running costs, especially in a hot climate.
- Shade and airflow: Ensure your outdoor unit remains shaded but with airflow. Even a little awning or lattice can reduce its workload on a blazing Perth afternoon.
- Correct temperature: Experts often recommend setting the cooling to about 23–24°C – any colder and you’re just paying more for marginal comfort.
By fine-tuning these details, your AC runs less and lasts longer. After all, keeping the heat out shouldn’t blow a hole in your wallet. And as one guide reminds us, it’s a “true investment in your home” done right, it pays off in comfort and resale value.
9. Schedule Maintenance and Enjoy the Warranty
The story doesn’t end after installation – treat your AC like a car. Regular check-ups keep it purring. Make it a routine: clean or replace filters monthly, clear the outdoor unit of debris, and call an HVAC pro each season if you can. Regular servicing maintains warranty coverage and extends lifespan.
In fact, Metro Air Conditioning points out that letting amateurs handle service or skipping it can void warranties. Always use a licensed technician for maintenance – they’ll lubricate moving parts, check coolant levels, and calibrate the thermostat. If something smells off or it’s not cooling as before, don’t wait – catching issues early prevents big breakdowns. Once everything’s installed and tuned, take a moment to savor that first rush of cool air after a hot day. Then set a reminder for 12 months from now to give your aircon another professional check. Treat it right, and it’ll return the favor with years of comfortable, efficient cooling.
| Aircon Type | Typical Install Time | Ideal For |
| Window Unit | 1–2 hours | Single room or rental |
| Split System | 4–8 hours | Individual rooms or small flats |
| Ducted System | 1–3 days | Whole-house climate control |
Table: General estimates of installation time for different air conditioning systems in Australia
For the WA Government’s official take on licensing, see the Refrigeration & Air-conditioning restricted electrical licence fact sheet.
In summary, professional aircon installation in Perth is all about planning and precision. From choosing the right system and location, to using a licensed installer for the heavy lifting, each step builds on the last. City of Cockburn – Owner’s Guide to Installing Domestic Air Conditioners: Do it right and you’ll be beating the heat comfortably and safely. If you’ve got more questions or want a quote, local Perth installers are happy to help. Stay cool, Perth!
Frequently Asked Questions:
-
How much does professional aircon installation cost in Perth?
Prices vary a lot by system size and complexity. A basic split-system install often starts around a couple of thousand dollars ,while a large ducted setup can run into the high thousands. It’s best to get quotes from a few installers for your exact needs.
-
Why hire a professional installer instead of DIY?
because it’s legally required and safer. Handling refrigerant and wiring without the right licences is . A pro guarantees the system runs efficiently, won’t void your warranty, and keeps you and your home safe.
-
How often should I service my air conditioner?
Ideally once a year. Regular service keeps the unit efficient and extends its life. Many warranties actually require proof of yearly servicing to stay valid.
-
How much does professional aircon installation cost in Perth?
Prices vary a lot by system size and complexity. A basic split-system install often starts around a couple of thousand dollars ,while a large ducted setup can run into the high thousands. It’s best to get quotes from a few installers for your exact needs.
-
Why hire a professional installer instead of DIY?
because it’s legally required and safer. Handling refrigerant and wiring without the right licences is . A pro guarantees the system runs efficiently, won’t void your warranty, and keeps you and your home safe.
-
How often should I service my air conditioner?
Ideally once a year. Regular service keeps the unit efficient and extends its life. Many warranties actually require proof of yearly servicing to stay valid.